Showing posts with label Amera. Show all posts

Tuesday, 21 February 2017

Castle Keep and Corner Ruined Building from Amera

Two vacuum-formed terrain-pieces from Amera that has been stuffed away in a corner for far too long a time. Now they are finished and stuffed away at the club J.
Corner Ruined Building is from the Future Zone Range.
We flocked these during our Terrain Day the other week and I then winterized them in with Tamiya Snow Effect.
Castle Keep comes from the 28mm Fantasy Realms range.
The ruin saw action in a game of Frostgrave at the club last Wednesday. A glorious victory for my witch even though her apprentice and the heroic bear got a bit messed  up...

Welcome follower Matt Barker from Printable Scenery

Monday, 6 June 2016

Another terrain-building weekend

Thomas came over this Saturday for another day of terrain-building and we accomplished quite a lot and used a lot of new tools – 3D-printer, static grass applicator and hot-wire cutter.
Static Grass Applicator
I bought a static grass applicator from WWS last year for a project that was delayed and it just laid there in a box. That one was used a lot during the day and to very good effect. We were both very satisfied with how it worked and the results. What we did was brush the ground with wood-glue and put on a layer of 2mm static grass. That will be so thick to practically cover the ground, you essentially don’t see the ground under the static grass. Over that we sprayed glue and put on another layer of 4 or 6mm static grass. The result is fantastic.
Hot-wire cutter
I bought this Proxxon hot wire cutter from the webshop Signalsidan a couple of weeks ago and used it for the floating rocks below. With this you can bend your cutting wire into whatever shape you want and then cut effortlessly, for example a river-bed. Thomas had a go with it and it’s the same here, very useful and a very good buy. It will be incredibly useful.
We bent the wire to a U-shape and Thomas played with it. A decent river-bed for a first try.
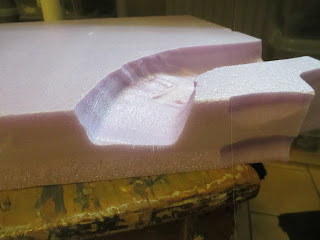
All in one piece (well, he did a little bit of carving after the big piece came off)
3D-printer
I bought this a couple of weeks ago and showed Thomas a bit of what I had printed and how it worked. There will be a post on the printer soon.

That’s the hardware, now for what was finished.
Flying boulders
These are for next game in the Pulp Alley campaign at the club. The Perilous Island campaign is nearing its end and the heroes will see the Island go up in flames and when that happens we need pieces of levitating broken ground, and these are the pieces. Think of them with black smoke obscuring the bottom pieces (you’ll see them in an AAR here soon).
I cut these with the hot-wire cutter, glued sand on top and sides and painted it chocholate brown before our terrain-day. 
Here they are, ready for action.
Hedges
We started these last year on a terrain-day and they were waiting for static grass. It’s rubberized horsehair hot-glued onto cork (DUGA from IKEA), dunked into coloured hamster bedding (all this done last year) and now grassed. We used a darker tone of 2mm static grass (applied over wood glue painted directly over the cork, no paints) and when dry we sprayed glue on top of the original layer of grass and applied a layer of lighter 4mm grass (or was it 6mm, can’t remember)
A pic from last year when we started these hedges.
Here they all are
Brambles
A very short experiment where we took a piece of rubberized horsehair, sprayed it with glue and applied 4mm static grass. The result is, in my opinion, a perfect piece of brambles or similar bush to be used as scatter terrain. I’ll do lots more of these.
Castle Ruin
I had this F201 Castle Ruin from Amera. The stonework was painted, ground covered with brown building acrylic with sand sprinkled over and painted chocolate brown. It was also waiting for static grass and we covered it in several colours of 2mm grass and topped that with 4 and 6 mm static grass. It turned out great, if I might say so.
only 2mm grass
4 and 6 mm grass added
3D-printed walls
I had these already painted and we grassed them. I guess there will be lots and lots of printed walls in the future, as you can never have enough. These are scaled for 28mm but I’ll do some down-scaled for 20mm scale too.
The new Harbour
We cut out the pieces for the new harbour also. It will be a big 120x180 cm piece, enough to cover one of the gaming tables at the club. Now I “just” have to scribe in the stonework. That will be for rainy days…
The new sections. The Bridge stands where I will have a removable canal.
Parts from the earlier harbour will be converted (i.e., cut up) for use in the new set-up. This part will be cut along the table-edge.
Same with this part. Cuts at the table-edge and by the pink foam.
A good terrain-making day!

Monday, 7 December 2015

Pyramid from Amera

I’ve bought some Amera pieces for my Frostgrave gameboard and this one, F232 Pyramid, is the first one finished.
Amera produces vacuum-formed white polystyrene terrain pieces and have everything from fantasy to SF in scales from 1/600 to 1/35.
The pyramid started out as a plain pyramid but I had other plans for it. 
For Halloween I bought a bag of skulls with the intention of boosting some terrain-pieces with it and the pyramid was perfect for that. 
I cut the skulls into suitable forms, glued them in place and finally green-stuffed all cracks.
For the ground around the pyramid I had these OO scale self adhesive stone paving slabs from Metcalfe and I glued them to the base with white glue to be sure it held.
Everything painted in the same style as the rest of my other Frostgrave buildings. To have at least some colour on the table I had the sides of the pyramids in antique red and drybrushed them heavily with the base colours to get a really worn look.

Another piece ready for Frostgrave.
Enough with these cultist!