Wednesday, 31 October 2018

3D-Printing Review: Future Worlds: Landscapes - modular war game terrain


I received some pre-release files from Nick Fatchen/Arid Hills a couple of weeks before he started his current kickstarter. Looking at them and the information given to me made me rather enthusiastic, as I think the whole concept is great – modular terrain-pieces that click onto each other making hills, cliffs and much more.
A couple of clips and a support to get a steady hill-end.
They click together using OpenLOCK, a proven system that I use for a lot of other terrain from Printable Scenery and others.
Support to give stability. They are a bit wobbly at the moment, but I'm told another variant is on the drawing-board. I would like one with extended top and bottom.
I’ve printed some different hill-pieces and cliffs to try out, and it all works rather well. I’ve noticed that I need to clean some of the connectors, especially those  printed down towards the printer bed. It’s essentially a couple of minutes work per tile, so it’s not a big deal.
When that is done the fit is excellent.
My standard 28mm female fighter from Otherworld, taking a stroll on some well textured but unpainted cliffs. She hardly notices the gaps between the tiles.
She prefers painted, though.
There are gaps between the tiles, obviously as they are tiles, but if that doesn’t bother you then you’ll have a very versatile set of modular terrain, with everything from hills to swamps to rivers to trenches (great!) to… well, lots of other stuff also.
Oooh, painted... They will look great with some static grass. 4 inch squares, as can be seen, measured in centimeters.
I think the best way to de-emphasise the gaps is to simply paint the tiles uniformly the same way, so as to not highlighting the gaps. The pics on the kickstarter unfortunately do just that, highlighting the gaps, that is.
There is an obvious other solution, and that is to make permanent hills. You click the tiles together, glue and then fill the gaps with green-stuff or something similar. That way you can get great-looking textured hills with a minimum of fuss. You will lose the modularity though, but I think the end result could be well worth it.
2 inch stepped hill outer corner being printed. I took around 5 hours to print on my Prusa i3 Mk3, with 0.2mm layer height and using 13 meters of filament, costing around €0.60. Hill tiles are typically between €0.40 and 0.80 each, depending on type and obviously filament price. I got mine for SEK 160/€16 for 1kg/340 meters on a sale from Clas Ohlsson. They are ordinarily SEK 200.
I really like this set, and I think there are tons of applications for the tiles. I will definitely play around some more with them and will probably go for both modularity and permanent hills. Maybe a mix of the two, where I make half hills, or something like that, and put them together. There are so many possibilities.
This is really good stuff and definitely worth a look, as it is a great concept. Do check it out at Future Worlds: Landscapes - modular war game terrain on Kickstarter. You’ve got until November 8, 2018, when it ends.

They won’t become extinct after that, I’m told, as the concept will continue to be supported with new tiles and there will be a web-shop to buy it all or in parts. Stay tuned on that also, as I’ll give a shout-out when that is live.
Now it’s back to the printer. I need more edges for my hill.

Monday, 29 October 2018

Wild West – Fistful of Lead, gallows, houses, outhouses and more


We’ve started a Wild West campaign at the club using the Fistful of Lead rules. They are really easy to learn, but not in any way simple. Two games in and we are really enjoying ourselves and the carnage that inevitably ensues.
The games inspired me to finish some figures, print some suitable stuff on the 3D-printer and go over the houses I already have and improve them somewhat.
First off is the gallows. I assembled and painted one from 4Ground a while ago, and now I dirtied it up with a wash. Nothing much but it does make it fit in with what other stuff we have at the club. Let’s say it’s a bit of a grimdark past.
I also had some unpainted crew and…customers… for the gallows, and they got a quick brush-job. Beside the gallows is a blacksmith from Shadows of Brimstone.
Next were some houses from Renedra, the American Church and a Farmhouse. They were also already painted and assembled, but got a couple of washes to look worn down.
One thing that is usually sadly missing when it comes to Western towns in 28mm scale, is outhouses. There ought to be quite a few of them and they do present some excellent cover.
I had a build but unpainted one from 4Ground (I think) that got a paintjob and a wash making it look…lived in… or well used. I think this will belong to the Saloon…
Then I printed two small shacks from Hayland Terrain. One is a sturdy shack, maybe filled with dynamite, and the other a conventional outhouse.
On top of that I also finished a couple of wagons, crates and some other small stuff.
Finally some photos of the last two games. The heroes are Killer Kim's Killers, a gang of kind-hearted desperados that love kittens and help old ladies cross the streets (preferably in cover behind them).
Killer Kim (in brown trenchcoat), and his gang - Fast Freddie, Rifle Rich, Shotgun Shaun (RIP in the first game) and Hatless Harry.
A huge shoor-out with the Castroulle Bunch. They were more or less slaughtered which was very satisfactory. For my part most of the game was a big shoot-out more or less centred around the barn in the background.
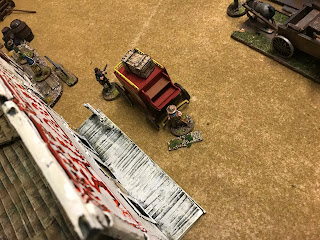
Second game - Rob the Coach. Two gangs try to rob the coach and one tries to defend it.
Jeppan manages to secure the coach in the end, and gets all the loot. But I get to shoot a lot of people and feel rather satsified.
Read of the first game here. It is of course filled with lies, but it will have to work.
Another game tonight. Should I go for a sneaky game and actually get some loot or the usual all guns blazing approach? Hmm, brawn or brains?
I think I know the answer to that…

Monday, 22 October 2018

Shoggoth from RAFM


My daughter gets to choose models from the tin- and plastics-mountain for me to paint now and again. 
This one, Shoggoth from RAFM, she selected quite a long time ago and it has been a very slow project, mainly because all of those eyes.
It’s another one of those models that has been standing there and that I have decided to finish once and for all.
It's a resin model with metal tentacles, and you decide which tentacles to use and where to put them.
Once I started on it again it all went rather fast. I just had to decide to prioritize it.
I’m really satisfied with the result. Not something I would like to meet in a dark alley or an abandoned house.

Tuesday, 16 October 2018

Thumb and Nail from Rise of Moloch


Everything is not 3D-printing now, even though that does take quite a bit of time.
Here’s the latest mini, Thumb and Nail from Smog: Rise of Moloch boardgame.
 
Another amazing, and unsettling, mini from that game.
I tried to paint them with inspiration from the card-art.

Friday, 12 October 2018

3D-Printing Review: Dungeon architect - Build a dungeon in a day


I was kindly sent a bunch of review-files from the Dungeon architect - Build a dungeon in a day kickstarter.
If you read the 3D-crowdfunding watch on this campaign a while ago, you know I found this to be good idea, and having tried it out I’m more than happy with the results.
The idea here is to 3D-print your rollers or stamps and then imprint their design into a suitable medium.
I printed the roller using PLA, layer hight 0.02 mm, Infill 50% (to get it really rigid). Print time was less than four hours and I used filament for around €1.50.

XPS (extruded polystyre) foam is the recommended candidate for walls and floors.
I first tried to work on pink foam, which is high-density. That turned out to be too compact, as the stamp I tried on it just couldn’t make a good impression. So, no pink foam, which is a pity as I got loads of that.
Next was EPS, that is the ordinary expanded polystyrene, you know the very cheap, white sheets (or packaging material) built from small beads that get everywhere if you try to cut it with a blunt blade. I’ve got loads of those sheets, too.
The roller and stamp worked great on this. Okay, you see contours of the beads, but there can simply be no cheaper way to get a dungeon up and running in minutes.
If you want a really cheap dungeon made in no time, and are not so focused on the aesthetics then this is a decent candidate.
Finally, I tried to get hold of the blue XPS foam (one brand is sold as Styrofoam), which is a bit lighter in density compared to pink foam. I tried several craft shops and builders shops. It seemed impossible to get hold of thin sheets of this, so I ended with a big 5 cm thick slab. From that I carved (with a very sharp blade) centimetre wide strips and finally I imprinted these.
It took me a couple of minutes to imprint two walls and one floor-piece. A minute or two with a glue-gun to stick them together. Another couple of minutes to paint them and probably two minutes to drybrush. A sizeable piece of dungeon corridor in ten minutes or so. You can hardly beat that!
I will continue to play with this, as I also got a brick-roller, a couple of more stamps, a cutter for door-arches and a printable door. You will see a couple of builds with this, that is for sure.
Absolutely recommended if you ever need a dungeon in a hurry. Great stuff!
My gamer-son said it all when I showed the rollers and stamps to him: 
This is just so smart!"
I do hope these will be for sale in some form after the Kickstarter. I'll keep you informed on that issue.
But don't worry, there is still time to pledge on the kickstarter, as it closes on October 17.

Monday, 8 October 2018

Prusa 3D-printer – up and running!


Monday last week I got a really big box.
Oh, a black box. You usually don't know what's inside one of those, just what goes in and what goes out. This time I knew.
In it was the long awaited 3D-printer, a Prusa i3 MK3.
Yay!
I got it up and running immediately, as I had ordered an assembled printer. Well, mostly running actually, as there are always some glitches in the beginning.
For me it was initially one of the fans that didn’t work, resulting in failed prints. When I figured out what was actually the problem with the prints I blew through the fan with compressed air, and that seem to have removed whatever was in there. One less problem.
Up and running the first print
After that one of the prints, a wall-section of my Printable Scenery Rampage Open Lock stuff I build dungeons off, got loose during a print. That turned out to be really messy as the printer gladly continued to print into thin air, resulting in a bundle of thin filament. A large bundle.
First object to print was this statue, the same I used to play around with on my old printer to get the settings right.
That was fixed with added brims, to those prints with small foot-prints, in the PrusaControl software I use to produce print-files from the STL-files.
All this while I was fiddling with layer-heights and infill to get a feeling of how it all affected the end-result.
A mystery print for a friend. Can you figure out what it is, Koen?
So now I’m printing away, happily. Everything seem to work as it should.
Next mystery print coming from a kickstarter that will go live on tuesday. Expect a review.
I’m printing a lot of modular dungeon at the moment, to be used in next weekends’ D&D game, and also review-stuff from two kickstarters. More on that soon.

Monday, 1 October 2018

James, a nurse and September Tally


The final two minis finished during September were James from Zombicide: Black Plague and a nurse from Shadows of Brimstone.
James in the art does look a lot like Sean Connery from The Name of the Rose, and that might explain his name.
The nurse is a hero specializing in healing and taking samples from monsters and whatnot, hence her green bottle.

A summary of September:
Painted:
Total: 19

Bought:
2 pulp characters from Bad Squiddo Games and a 1/48 car-kit.
Total: 3

2018:
Bought:         194
Painted:         -116
Sold:              -180
Total:            - 102